In this article, we will learn how to deploy a web-job to the Azure platform using PowerShell script. Many of you might have already used other ways such as Local Git, FTP, OneDrive Sync, Azure DevOps (formerly VSTS online), Dropbox Sync etc.
You might also have used Visual Studio SDK and publish wizard which is a GUI based easy way that enables you to perform this task through several dialog windows. What if you have hundreds or thousands of web applications to be deployed on the cloud?
Well, you may not want to spend a lot of time on clicking dialog boxes, instead, you may want an easy script to run on few key presses or few clicks. So here we are !!
Microsoft Windows platform has already given us Windows PowerShell ISE desktop app to perform such tasks much similar to cmd prompt. We can also install Azure CLI tool which allows us to run easy short commands for deployment.
Here I am assuming that viewers are already aware of Azure portal services and .Net core or simple console or web application is written in .Net.
Before jump into the deployment process, you may want to understand what Azure app services, Web Apps and Web jobs are. Because these are the key points to deploy a webjob.
Azure App service
Azure App service is a hosted service and a fully manages PaaS (Platform as a service) or in simple terms, we can say It’s a service to host our multiple types of applications and APIs on the cloud, for example, Web Application, Rest APIs, Mobile backends, and we can use .Net, PHP, Python, Java, HTML both for Windows and Linux Operating Systems.
You can find more details on Microsoft documentation :
You can find App service by searching on the Azure portal as below:
If you click on Add service button, you will see several services provided by Azure to host your applications or projects.
Web Job
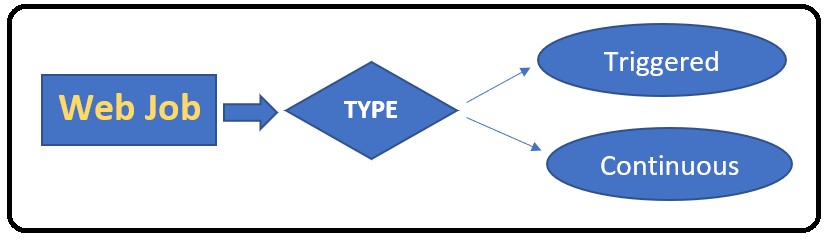
Web job is a feature in Azure app service that gives you the facility to run your program or script using the same infrastructure as a web app, API app or the mobile app. Web jobs are a great way to run your asynchronous process such as batch data. Therefore, it enables you to run a long-running process without worrying about it being terminated prematurely.
So basically, a web job is a service located within an Azure App service suite and allow us to carry out scheduled or continuous tasks just like an old windows service.
Triggered Jobs can be run one time or periodically until an expiration date. It can be executed through a request with a script, but it has to be triggered through an endpoint. It cannot be remotely debugged and always requires a VM or web app. Another type is a scheduled webjob, which is actually a triggered webjob with a schedule CRON expression. The schedule is defined in a settings.json file that sits alongside your webjob executable.
Continuous job starts immediately when the job is created. It can be debugged and always requires VM or WebApp. To keep the job from ending, the program or script typically does its work inside an endless loop.
WebApp
WebApp is a part of Azure App services, it is a platform which enables you to build and host applications on Azure without managing infrastructure with lots of advantages. If you click on webApp on Azure, you will see a better description as below :
Azure App Service Plan
App service plan is a container for WebApps , which means It provides a set of resources to run a webApp. When you create an app service plan in a region, a set of compute resources is also created for that plan in that region. One or more apps can be configured to run on the same computing resources or on the same App service plan. The pricing tier of an App Service plan determines what App Service features you get and how much you pay for the plan.
For more details please visit the following Microsoft documentation:
Creating a webjob from scratch
Azure CLI is installed via an MSI Installer gives you access to the CLI through the Windows Command Prompt (CMD) or PowerShell.
*We also require Azure storage explorer tool which we will use to test our storage account for testing.
Setup before deploying a webjob
There are a number of activities to be performed before deploying a webjob. We will quickly understand this by the following diagram-
Let’s start the setup. Run these commands on Azure CLI tool–
1- Login Azure account
az login
This command will open a tab in the browser where you can log in to your Azure account and you can close the tab after successful login.
On successful log-in, you will see your Azure account and subscription details. Below the screenshot for this command :
2- Create a resource group
az group create --name TestAnuRG1 --location "WestEurope"
or
az group create -l WestEurope -n TestAnuRG1
This command will create a resource group with the name “TestAnuRG1” in WestEurope location.
We can verify this resource group on our Azure account, alternatively we can create this from azure portal in few clicks. Below is the screen in azure portal, yes, we got the newly created ResourceGroup.
3- Create a storage account
az storage account create -n anuvermastorage1 -g TestAnuRG1 -l westeurope --sku Standard_LRS
Give a unique name to the storage account with other parameters, which are - The name of the resource group and location with sku details. Storage account name must be between 3 and 24 characters in length and use numbers and lower-case letters only.
We can see, a storage account has been created on our Azure account
4- Create an app service plan, which will host our application
az appservice plan create -n AzureAnuVermaServicePlan -g ` TestAnuRG1 -l WestEurope
5- Create a webApp
az webapp create -n AnuVermaWebApp1 -g TestAnuRG1 -p AzureAnuVermaServicePlan
This command will create a webApp in the specified app service plan and resource group. It will create a default host for us. See below screenshot.
On Azure portal we can see, now we have AppService plan, webApp and a storage account as below:
6- Configure the AppService by setting webApp as always-on
az webapp config set --always-on true --php-version Off -n AnuVermaWebApp1 -g TestAnuRG1
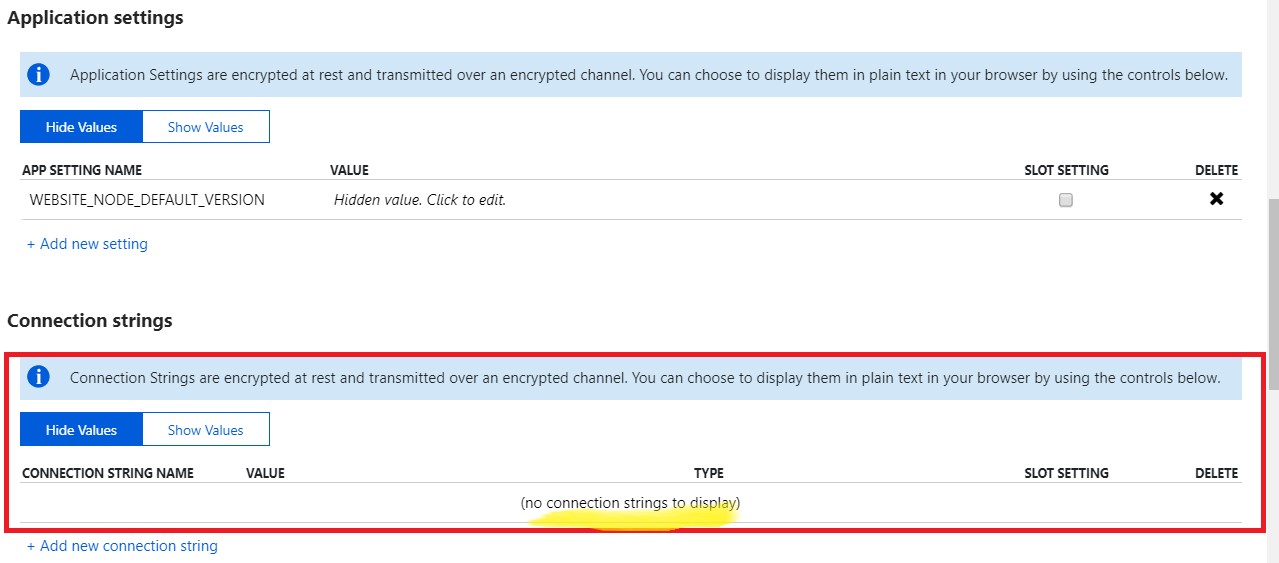
7- Create the configuration connection string
Set Application Setting, Connection string AzureWebJobsStorage and AzureWebJobsDashboard
Currently, we have an empty connection string. We have to create it.

As per Microsoft MSDN document :
These next two settings can be tricky if you don’t understand how Azure App Services handles settings.
The default templates for .NET projects can and do utilize App.Config files AND they set these values to empty strings. With that in mind, you make the changes in App.Config or delete the entries (because they override the portal settings) and set these in the dashboard. In other words, if you define this in the Azure Portal, but do not take the settings out in the App.Config, you are overriding these settings with blank values in the App.Config probably without realizing it.
Connection string AzureWebJobsDashboard might be optional.
Note: If you do not add this setting and this is a project you created in Visual Studio using the WebJobs SDK, your WebJob will fail to run. If your project is NOT created and deployed as a WebJob, your WebJob may still run however you will get a 404-error page when you try to visit the WebJob logs page: https://portal.azure.com/Error/UE_404?aspxerrorpath=/null&shown=true.
You can still get to the portal however if you navigate to the WebJobs Log in Kudu:
https://WEBAPPNAMECONTAINGWEBJOBHERE.scm.azurewebsites.net/azurejobs/#/jobs
Connection string AzureWebJobsStorage is optional but if you are using the Azure Web Jobs SDK, this is required. This is how the SDK does the magic of wiring up Queues, Tables and Blobs for use in your WebJob.
(i) Get the Connection String
az storage account show-connection-string -n anuvermastorage1 -g TestAnuRG1
(ii) Create the Configurations in the Web App
In previous command(i) You will get a connection string value.
Syntax:
az webapp config connection-string set --connection-string-type Custom --settings AzureWebJobsDashboard=<connection string> AzureWebJobsStorage=<connection string> -g <resourcegroupName> -n <WebAppName>
I ran the following command using my connection string :
az webapp config connection-string set --connection-string-type Custom –settings AzureWebJobsDashboard="DefaultEndpointsProtocol=https;EndpointSuffix=core.windows.net;AccountName=anuvermastorage1;AccountKey=3Iyn2SfIdgPvzCyXpBBN4WFL+OyLWndGrQT1VRPEOkTe+UnCGzecO209fsFdaRyjtS6Fizyb9Qjh1oRmA7hfxw==" AzureWebJobsStorage="DefaultEndpointsProtocol=https;EndpointSuffix=core.windows.net;AccountName=anuvermastorage1;AccountKey=3Iyn2SfIdgPvzCyXpBBN4WFL+OyLWndGrQT1VRPEOkTe+UnCGzecO209fsFdaRyjtS6Fizyb9Qjh1oRmA7hfxw==" -g TestAnuRG1 -n AnuVermaWebApp1
Below is the screenshot of how my command worked:
So now we have successfully created both the connection strings. As we can see on the portal:
Where is our WebJobs stored on Azure?
A WebJob is stored under the following directory in your site on Azure:
site\wwwroot\App_Data\jobs\{job
type}\{job name}
Where {job type} can be either continuous for a job that is always running or triggered for a job that starts from an external trigger (on demand / scheduler).
And {job name} is your WebJob's name.
So if I named my continuous WebJob as myjob1, then it will be located on Kudu portal at :
site\wwwroot\App_Data\jobs\continuous\myjob1
So, if I named my triggered WebJob as myjob2, then it will be located on Kudu portal at :
site\wwwroot\App_Data\jobs\triggered\myjob2
Basically, the URL constructed by the name of your webApp followed by “scm.azurewebsites.net” as below:
https://<your
web app name>.scm.azurewebsites.net/
for example ,
in my case it is:
https://anuvermawebapp1.scm.azurewebsites.net/
Right now, I do not have any webjob in my webApp, we can see [] webjobs (empty array) on our portal by going on below options-
WebApp-> Go to Advanced Tool-> Click on Go-> Kudu service -> WebJobs->All
Here you see [] (empty array), means no web job deployed yet.
So now we are ready to create our web application. And deploy our project with above configured setup as a webjob on azure.
Part-2 Deploying a webjob with Windows PowerShell ISE
$resourceGroup = "TestAnuRG1"
$location = "West Europe"
$appName = "AnuVermaWebApp1"
$planName = "AzureAnuVermaServicePlan"
Step-3 Get the credentials for deployment
# get the credentials for deployment
$user = az webapp deployment list-publishing-profiles -n $appName -g ` $resourceGroup --query "[?publishMethod=='MSDeploy'].userName" -o tsv
$pass = az webapp deployment list-publishing-profiles -n $appName -g ` $resourceGroup --query "[?publishMethod=='MSDeploy'].userPWD" -o tsv
Step-4 Build and publish our project
Store the path of your project in a variable and publish it using dotnet publish command in release mode as below:
$publishFolder = "E:\test code\GetDesiredDate\GetDesiredDate"
dotnet publish $publishFolder -c Release
This command will create an app.publish profile in release folder as below:
Note: In case of .Net Core Application this path will be something like:
E:\test code\coreApplication1\coreApplication1\bin\Release\netcoreapp2.1\publish
In such cases, while deployment we have to provide the path of this publish folder.
Step-5 Deploy our first webjob using kudu webjob API
Provide the path of this app.publish folder created in the previous step.
We simply need to provide AUTHORIZATION and CONTENT-DISPOSITION header.
# make the zip for main publish folder
$task1zip = "task1.zip"
if(Test-path $task1zip) {Remove-item $task1zip}
[io.compression.zipfile]::CreateFromDirectory("E:\test code\GetDesiredDate\GetDesiredDate\bin\Release\app.publish\", $task1zip)
$ZipHeaders = @{
Authorization = $basicAuthValue
"Content-Disposition" = "attachment; filename=run.cmd"
}
Deployment on Azure-
1- Triggered webjob
We will create a triggered WebJob using kudu API as follows, here we will use the PUT verb to upload the content on Kudu.
# upload the job using the Kudu WebJobs API
Invoke-WebRequest -Uri https://$appName.scm.azurewebsites.net/api/triggeredwebjobs/Webjob1 -Headers ` $ZipHeaders -InFile $task1zip -ContentType "application/zip" -Method Put
We got the status OK, now we can check the same on our Azure portal :
2- Similarly, we can create a continuous Webjob using the following command:
Invoke-WebRequest -Uri https://$appName.scm.azurewebsites.net/api/continuouswebjobs/anuWebJob1 -Headers $ZipHeaders -InFile $task1zip -ContentType "application/zip" -Method Put
To check it worked, you can visit the Kudu portal and explore the contents of the app_data folder or look at the web jobs page.
# launch Kudu portal
Start-Process https://$appName.scm.azurewebsites.net
It will open the following screen in the web browser.
To verify the deployment on PowerShell prompt, we can run the following command to get all triggered webjobs inside our webApp using GET verb as follows:
# get triggered jobs
Invoke-RestMethod -Uri https://$appName.scm.azurewebsites.net/api/triggeredwebjobs -Headers $Headers -Method Get
d
Similarly, we can search our Continuous webjob-
#Get Continuous Webjobs
Invoke-RestMethod -Uri https://$appName.scm.azurewebsites.net/api/continuouswebjobs -Headers $Headers -Method Get
So, in the above screen, we can verify that we have successfully deployed our webjobs.
Initial Status of the jobs-
Step- 6 Run the triggered web job
To run the webjob we can post to the run endpoint for this triggered webjob. And we can optionally pass arguments in the query string. Don't forget to provide the content type or you'll get a 403 error.
# run the job
$resp = Invoke-WebRequest -Uri "https://$appName.scm.azurewebsites.net/api/triggeredwebjobs/Webjob1/run?arguments=arg1" -Headers $Headers -Method Post -ContentType "multipart/form-data"
This command runs our triggered webjob.
Now we can see successfully deployed and running webjobs.
Step -7 Log History
If we want to know the log history, we can use the following command-
# output response includes a Location to get history:
if ($resp.RawContent -match "\nLocation\: (.+)\n")
{
$historyLocation = $matches[1]
$hist = Invoke-RestMethod -Uri $historyLocation -Headers $Headers -Method Get
# $hist has status, start_time, end_time, duration, error_url etc
# get the logs from output_url
Invoke-RestMethod -Uri $hist.output_url -Headers $Headers -Method Get
}
Step – 8 Run a scheduled Job – A simple .net application
Scheduled jobs are triggered jobs, but they are deployed to run periodically just like applications running from windows scheduler. We specify a CRON expression to tell the Azure system as to how to run and when to run the job.
we're using a regular .NET console app running on the regular .NET framework. Here's the code:
We'll build it with MSBuild and create a zip, very similar to what we did with the first webjob:
Locate your msbuild.exe utility in your file explorer -> Program Folder (x86) under Visual studio.
In my case I have VS community version, but you may have other versions for example Enterprise.
In my case I found it in following directory:
C:\Program Files (x86)\Microsoft Visual Studio\2017\Community\MSBuild\15.0\Bin\msbuild.exe
Run the following command :
# build the regular .net webjob
$msbuild = "C:\Program Files (x86)\Microsoft Visual Studio\2017\Community\MSBuild\15.0\Bin\msbuild.exe"
. $msbuild "E:\test code\SimpleConsoleApp1\SimpleConsoleApp1\SimpleConsoleApp.csproj" /property:Configuration=Release
This build creates a Release folder :
Now run the below command to create a zip folder(task2.zip) of published files, Provide the source path as release folder’s path :
$task2zip = "task2.zip"
if(Test-path $task2zip) {Remove-item $task2.zip}
[io.compression.zipfile]::CreateFromDirectory("E:\test code\SimpleConsoleApp1\SimpleConsoleApp1\bin\Release\", $task2zip)
This creates a zip folder in C:\Users\AnuVerma\
You can give any other folder path as well, as we are creating a zip of release folder’s file so do not give the release folder path as a destination, otherwise, it may end up in error of [can’t access files used by other process]
Now deploy the job :
# upload the web job
$ZipHeaders = @{
Authorization = $basicAuthValue
"Content-Disposition" = "attachment; filename=SimpleConsoleApp1.exe"
}
#Delpoy the job
Invoke-WebRequest -Uri https://$appName.scm.azurewebsites.net/api/triggeredwebjobs/myScheduledJob1 -Headers $ZipHeaders -InFile $task2zip -ContentType "application/zip" -Method Put
We got a success message-
We successfully deployed our webjob, It’s in the Ready state, but it is not scheduled yet. We have to set a CRON expression to provide it a schedule to run periodically.
Here we haven’t provided setting.json with a cron expression in our zip file, but if we'd included this, then this would already be a scheduled job with nothing further to do.
But yet we don’t have it, so let us push the contents of the settings file, which we can use to set the schedule. Here we'll set up our third webjob to run every 1 minute, as follows:
Now, this myScheduledjob1 will run in every 1 minute.
In the above screen, you can see, the status is now running for myscheduledJob1.
In Logs we can see it’s running history, we can also toggle output by clicking on the running Job-
Navigating through the webjobs on Kudu